Pages

Showing posts with label stampin up. Show all posts

Tuesday, June 18, 2013

It's a girl!

    No, not my sister's baby.  We're still waiting to hear on that one, but my husband's cousin is also pregnant and expecting right around the same time as my sister.  His cousin knows she's having a girl and she just happens to love the color purple.  Putting those two facts together I made her a scrapbook and was thrilled when she just loved it!  Now that I know she has her book in hand and I'm not ruining any surprises I thought I'd share the page layouts. 


Sunday, June 2, 2013

Lion's galore

   In preparing for my sister's baby shower this past month I've been creating away but couldn't share since I wanted to keep everything as much of a surprise as possible.  Here are photos of the  scrapbook pages, which I made as her gift.  I also made invitations, Thank you cards, birth announcements and cake.  Her whole theme was Lion King so I went a little lion crazy! 


The cake was super easy to make.  I found the directions and inspiration here

Thursday, May 16, 2013

something fishy

       I was up at the crack of dawn making party invites today.  It's a fish/ camouflage themed party and yet the only fish stamp I had was a tropical fish.  I decided to use more mustard, old olive, chocolate chip and close to cocoa ink to make the fish look less tropical and I just love how the invites turned out! 

   I used chocolate chip for the background & whisper white for the foreground.  I used the dot invitation stamp in chocolate chip for the words and a stem from one of my flower builder sets for the pole.  I then punched a hole at the top of the hole, added an eyelet in white and tied twine around it.  I used markers to color and stamp the fish, which I then cut out.  Holding two fish together, while slightly overlapping them I used my crop- a -dile to punch a hole near the mouths and attached another eyelet.  I threaded the twine through and now it looks like my fish are hanging from the end of my line.  

Saturday, April 6, 2013

Happy Easter!

  Yes, I know I have the wrong weekend, but I did make Easter cards this year for my guys and I have yet to get around to blogging them.  Sorry, what can I say?  We've been very busy around here.  But today is one of those days I'm planning on locking myself in my craftroom and getting a bunch of scrapbooking/ cardmaking done.  Wish me luck; my plans don't always work out the way I hope so we'll see if I get to write another post later or not.


        I don't love these cards; seems like lately I don't really like anything I've been making.  Cards and scrapbook pages keep disappointing me.  I don't know if it's because I always feel so rushed for time or if it's just that I've lost some of that passion and I'm just going through the motions.  Anyhow I thought I'd post some photos of last year's Easter cards.... though now that I look at those I don't love 'em either.  Maybe my expectations are just a bit to high after seeing all the wonderful creations everyone else makes on Pinterest.  Seriously, many of those pages and cards just blow me away!


Wednesday, March 13, 2013

Masked Invitations

         I decided I should set aside my scrapbooking and get some invitations made.  I decided to just use a balloon stamp.  I made postcard invites by cutting three  8 1/2 x 11" sheets of pumpkin pie card stock into quarters.  I then trimmed three sheets of whisper white card stock to measure 4 x 5 1/4".  Using my Pumpkin Pie stamp pad I stamped the Dot Invitation to the bottom/ side of the white card stock.  I used my double hole slot punch to make a hole in the top of the invitation and threaded some orange satin ribbon through it.  I decided I wanted a cluster of balloons and used a technique called masking.  To do this I stamped the red balloon; once on the card and once on a scrap of paper.  I cut out the paper scrap balloon and laid it over the red balloon on the card creating a mask.  I then stamped the orange balloon onto the white card stock and a second orange balloon on to the scrap paper.  Once I cut out that balloon I masked the orange balloon (and kept the mask on the red balloon) and stamped my final green balloon.  I ended up making 10 invitations and I used the same two scrap paper masking balloons for them all.  They stayed neatly in place allowing me to stamp over them and keep the images they were masking underneath intact and clean so it looks like the balloons are in front of one another in a cluster.  If your masking pieces move at all while you are trying to stamp try stamping your image onto the sticky side of a post it note and then cutting it out.  The post it note will stick to (and remove from)  your image allowing you to try masking too. 

Tuesday, February 19, 2013

For the birds

      Well, so far my plan is working.  Knowing I had this blog started I decided, rather than follow the boys around and nag them all morning about getting ready for their day, that I'd take a short 10-15 break and make just one card.  That was my goal and I'm happy to say I LOVE the cute, quick and easy card I came up with. 
     I tend to pick boyish colors and kid themes, not only because of my 3 boys, but because I have 16 nieces and nephews with one more on the way (all aged 9 & under!), not to mention all the assorted friends of the boys and kids of our friends.  We're surrounded by kids and kids birthday's so I like to be prepared in case one sneaks up on us. The majority of the kids are boys and I find boys/ men are harder to make cards for in general, but I'm getting better at it.
       For this card, I used navy card stock to make the card and then used a lighter blue for the background.  I used my big shot and a letterpress die, inked with night of navy craft ink, to "stamp" the fans on the background paper.  I then stamped my bird image using basic black on a small strip of white card stock and used the markers to color them in yellow.  I used my adhesive to assemble the card and tied a pretty yellow ribbon bow on the side.  It was simple-- any beginner stamper could easily make this card and it was very quick.  I hope you like it!

Monday, February 18, 2013

Stampin Up! Club

       I have a girl's night out once a month where myself, a bunch of other wonderful ladies and my local Stampin Up! Demonstrator get together and stamp.  It's great fun and last night was no exception.  One of the ladies just had a cute little baby girl and her baby nephew was there too so I not only got to make two beautiful cards, I got to hold two adorable little babies too.  What could be better?! 
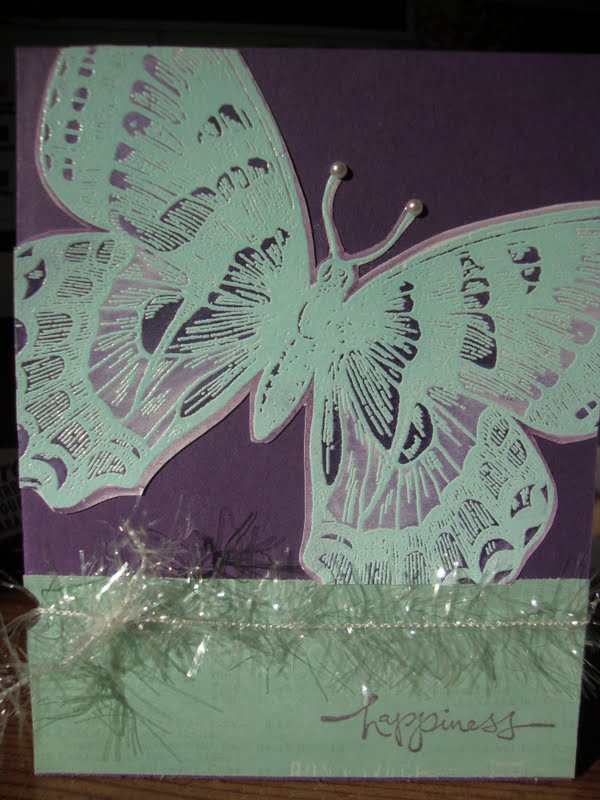
      The first card, I have to admit, was not the one we made at camp last night.  We used Stampin Up!'s new Swallowtail butterfly stamp and the pool party embossing powder to emboss the butterfly on white card stock. We were then supposed to color the butterfly in with orange, yellow and purple ink using our blender pens. I'm not a huge fan of orange and planned to use only purple and yellow, but I ended up using just purple.  I loved the two tones that showed up as I blended so I went with it.  We were then supposed to attach the whole butterfly (with white background included) onto a yellow card front; which I did.... but I just didn't love it.  Fast forward to this morning where I decided to cut out the butterfly and adhere it to the front of a purple card.  I trimmed the edges of the butterfly even more to fit at the top of my card.  Used some Pearl stickers on the antenna, and attached a strip of green paper at the bottom of the card.  Using the word window punch I made a small circular cut in the edge of the card and threaded the ribbon through it.  I thought it was still missing something so I scrounged around in my drawer to find an appropriate word stamp and used my Plum stamp pad to stamp the word.  Then I stood back and realized I LOVED the card.  Now I can't take full credit for this as I found this card on Pinterest and used it as a jumping off point.  I loved her card and so I copied the layout; honestly this is one card I probably would have copied exactly if I had the supplies!  I often find cards I like and either use the layout or the color scheme on other cards, or use the layout and change the color scheme, etc. 


     Our second card was a 2 step stamping card.  I love 2 step stamping!  We started with a navy card and stamped the large french script background stamp in crumb cake on vanilla paper then wrapped it in crumb cake ribbon and adhered it to the card front.  Using another piece of vanilla paper we stamped two large flowers and two small flowers in light blue and 3 sets of leaves in light green.  We then stamped right over the images using dark blue ink and dark green.  We then cut out the flowers and leaves and adhered them to the card front. 


I just love Pinterest and you can follow my stamping/scrapping board here