
Sunday, February 24, 2013
Brads, buttons and bows
OK so day #3 found me organizing my bin of brads, buttons and assorted embellishments. I may have bitten off more than I can chew as I only managed to organize my brads today. I had no idea I had so many! I should have realized it since it is my favorite embellishment to use. Rare is a time when I don't use brads on a card or page. I have brads in Disney shapes, cooking and kitchen utensils, trucks and tractors, stars, and every color of the rainbow. I have had this magnetic organizer for well over a year. I kept waiting for my husband to hang it (and for me to decide WHERE I wanted it) but today I decided enough was enough and I filled it up. I had bought some extra canisters and honestly, I need more. But I love how it looks with all the colors sorted. And I love the idea that I can see them all. I often forget to use embellishments or re-order ones I already have forgetting that I bought them. I'm kind of bummed though as I've been searching on-line at Joann.com, Amazon.com and Michaels.com and can't find the same version I have. I'll keep looking though! I also know I want to mount his over my bins of paper (this picture was taken of it lying flat on my table... I lost the mounting hardware and so I will have to wait for my husband to come home to put it up). If you use this set; be careful not to overfill any of the tins though. I had one that was pretty full and when I went to hold it up to the wall a lid fell off and most of the brads from that compartment fell back out (landing in all of my paper bins!)... it was a mess! But I rearranged some of the brads so the tins weren't so full and they seem fine now. Though, I'll admit, I am a bit nervous now to go into my room one day and find brads all over the place!

Saturday, February 23, 2013
Scraps, scraps, scraps
I had a bit of time this morning and decided that rather than do the dishes I'd prefer to work in my craft room. I had 4 drawers that were filled with scraps of all shapes, sizes and colors and
I often pull all 4 of them out when looking for a specific piece or color of paper. It seems like I've gotten to the point where I don't want to throw any scraps away. I look at a piece and think of all the possibilities, especially with my Cricut when some of the accents are so small and require only a tiny piece. I've seen so many wonderful ideas for using scraps on cards on Pinterest; if you're on there try searching for card scraps you'd be amazed at all the ideas you can find.
Try these sites for some ideas:
- A glass ornament with paper scraps
- Scrap card
- Video tutorial about making cards with scraps

Friday, February 22, 2013
Organization is the key
Looking to "neaten" up my craft room I've been searching Pinterest for ideas and inspiration for creating my perfect space. Sometimes I spend what feels like hours searching for the right color or pattern on a paper to go with the photos for a scrapbook page, or I'll end up ordering a tool, stamp set, or embellishment & end up realizing I already own it! I thought my craft room was pretty well organized but it has never been "perfect." In the beginning I was just to happy to have one I didn't mind that I didn't have much money left to spend on organizing it and I made do with bins and containers I found around the house. Here we are several years later and I don't think I've purchased anything to help organize it yet. I have, however, purchased a lot more "stuff" and now the room is looking very unorganized. While I am usually pretty messy while I'm crafting and often thrive in the chaos it's starting to get to me. Especially when I start looking around at other people's blogs, magazine articles and Pinterest. I've poured through room after room, idea after idea, looking for those that really get me excited. Here are some of my favorite inspirations:
Taking a page from almost ALL the rooms I looked at I decided to tackle one small corner of the room today. My 12x 12 scrapbooking papers. I decided to color code all my paper this morning. It took a little over an hour as I even went through all my bound "books" of paper like DCWV (Die cuts with a view) and pulled them apart page by page. I thought it might get tough when they were heavily printed but I had read on one blog where she decided what stack to put it in based on what color she'd most likely use (or the color that inspired her to buy it). It ended up being fairly simple as most pages had a color or two that really stood out. I did keep a few "themes" separate though; Disney, Halloween, Christmas, and Wedding. I did that only with paper that could not possibly be used as anything else. If it was Disney paper but was just colors, dots or stripes I mixed it in with the color stacks but if it had a character on it or a ride pictured on it I left it in it's own stack (same goes for Christmas, Halloween, and Wedding). I love how it looked in the end and used my label maker to further organize. I think this should help cut down on the time I spend looking for just the right paper... if not at least it looks pretty!

- Nicohol's Craft Studio; not all that surprising since all her stuff comes from Pottery Barn and while I LOVE that catalog and their stuff I'm never willing to spend that much money.
- Scrap- therapy: Honestly as I looked through her blog, I just loved her whole house! But I loved the idea of taking apart all stamp sets & putting them together by theme NOT by set! She also unmounted all wood sets to use as clear mount and gave instructions; something I'm toying with as a space saver
- My scraproom by scrapbook.com features rooms all the time-- I loved the inks and punches all lined up and easy to see/ use
- Dragonfly Dreams: what can I say? Her space is totally Dreamy!
Taking a page from almost ALL the rooms I looked at I decided to tackle one small corner of the room today. My 12x 12 scrapbooking papers. I decided to color code all my paper this morning. It took a little over an hour as I even went through all my bound "books" of paper like DCWV (Die cuts with a view) and pulled them apart page by page. I thought it might get tough when they were heavily printed but I had read on one blog where she decided what stack to put it in based on what color she'd most likely use (or the color that inspired her to buy it). It ended up being fairly simple as most pages had a color or two that really stood out. I did keep a few "themes" separate though; Disney, Halloween, Christmas, and Wedding. I did that only with paper that could not possibly be used as anything else. If it was Disney paper but was just colors, dots or stripes I mixed it in with the color stacks but if it had a character on it or a ride pictured on it I left it in it's own stack (same goes for Christmas, Halloween, and Wedding). I love how it looked in the end and used my label maker to further organize. I think this should help cut down on the time I spend looking for just the right paper... if not at least it looks pretty!

Thursday, February 21, 2013
Done Disney!
OK, I think I am all done our Disney pages, as of this morning when I whipped up two more pages.... two more last pages. I know I talk a lot about Stampin Up! products but I'm not a demonstrator nor am I all that brand- choosy. I will use anything and everything on a scrapbook page. I have a whole room filled with products-- big shot, Cricut, stamps, paper of all sizes, colors and patterns, ribbon, Clip it up (filled with Jolee's Boutique and other assorted stickers), etc. Scrapbooking and paper crafting is my passion and I can't say I have a favorite anything! Can you? If there is some product you just LOVE and can not live without please leave a comment. I'm always looking for new things! Anyway, onto today's pages.


I had the "Magical Memories" banner title left over from a Disney scrap kit and that's where the whole inspiration for the page came from. I pulled a light blue/gray sheet of 12x12 paper out and using a dark blue/gray page cut a 8.5 x 8.5 square. I cut all the pictures to 4x4 and mounted them on the dark blue square. I then decided to cut a 8.75" square of white paper to make it "pop." I laid the title and the mounted pictures on the background paper and knew it needed something else. I decided to back the title with the dark blue paper as well and then used a few white ribbon scraps behind it. Lastly, I decided to play up the stars on the title and pulled out my Cricut with it's George and Basic Shape cartridge and cut out 6 stars; 2 of each in the 1",1.5" and 2" sizes. I like things to sparkle (especially stars) so I sued some of Stampin Up!'s Crystal Effects and Dazzling Diamond glitter to the edges of the stars. Rather than a traditional journaling block I wrote a few quick reminders on the stars.
This next page, I just love! Probably more because of the actual pictures than the page itself. I love those unplanned moments in our trip when something memorable happens out of the blue. It's even better when I have my camera handy to snap a few pictures. We were waiting on Main Street for the parade to start on a drizzly cool day, eating some snacks. My kids discovered those sugar straws at Disney on our first trip and look forward to them every time we go on vacation (they even scout them out when we're not at Disney now!). Ian had just finished his as the parade was approaching and his blue/green tongue and teeth attracted a LOT of attention. He loved getting to talk to the characters and boy did they make him laugh! The best was when this "ugly stepsister" (sorry I don't know her name-- I have three boys so the whole princess thing was never very popular in this house) stopped and in all seriousness asked him "who did this to you? What happened?" He laughed and said it was his sugar stick. "Sugar stick; that sounds good. Was it good?" Yep he says. He then really laughed when she ran off yelling to her "mother" and "sister" "This boy had a sugar stick. That sounds good I want a sugar stick." I don't know if my kids are just extra lucky or what but we always seem to have characters stop and talk to us or pull them out to participate during parades and shows. It's great!

OK, I'm sure you're thinking enough already, what did you use to make the page? The background paper I actually got as a spiral bound bundle at our hotel store at Port Orleans. I'm always looking for scrappin' things as we're on vacation. I'm not a huge souvenir fan; my money is spent on the actual pictures and the scrapbooking supplies. I thought this page was just adorable and with Goofy's arm full of snacks, it seemed pretty appropriate too. I used royal blue and white paper to mount the photos on to and for my journaling block too. I then used a scrap of white and my Cricut with it's George and Basic shape cartridge to cut out the words. It was a super quick, easy, page. They aren't always though and I have plans soon to write up a blog showing my top 10 favorite pages of all time (so far!).
Wednesday, February 20, 2013
More Disney?!
My kids were happily engrossed in video games, or playing outside, all afternoon yesterday so I took the opportunity to sneak away into my craft room. I have this huge box of pictures I'm trying to get scrapbooked. I have never had to many pictures on hand at one time and it's very overwhelming. I'm having a hard time remembering the order they were all taken in and, for some of them, I can't remember why I thought they were important to take.

Scrapbooking is supposed to be my enjoyable outlet but lately it's just stressful. My "to do" list is very long! From the day my oldest son was born I've managed to keep on top of all my scrapbooking (and with three boys there's a LOT of it!). They each have their own set of scrapbooks plus I've done some random family vacation books. That said I'm a year behind at this point and I'm really freaked out by that. I know most scrapbookers are like "what only a year?! That's great!" but it really does upset me. One plus is that I've really scrutinized everything we've done for the past year to decide if it's scrap- worthy. Unfortunately, I came across a whole envelope of Disney trip pictures from last February. I thought I was done with Disney and had moved on but I couldn't just ignore these particular photos. So yesterday afternoon I scrapbooked two more Disney pages for my middle son and I'm hoping to get two pages done for my oldest son today; then I should be really, truly done with our last Disney trip. Good thing too as I'm busy trying to plan our next trip!


Scrapbooking is supposed to be my enjoyable outlet but lately it's just stressful. My "to do" list is very long! From the day my oldest son was born I've managed to keep on top of all my scrapbooking (and with three boys there's a LOT of it!). They each have their own set of scrapbooks plus I've done some random family vacation books. That said I'm a year behind at this point and I'm really freaked out by that. I know most scrapbookers are like "what only a year?! That's great!" but it really does upset me. One plus is that I've really scrutinized everything we've done for the past year to decide if it's scrap- worthy. Unfortunately, I came across a whole envelope of Disney trip pictures from last February. I thought I was done with Disney and had moved on but I couldn't just ignore these particular photos. So yesterday afternoon I scrapbooked two more Disney pages for my middle son and I'm hoping to get two pages done for my oldest son today; then I should be really, truly done with our last Disney trip. Good thing too as I'm busy trying to plan our next trip!

I used a teal and white patterned paper from Stampin UP! as my background paper. I used a dark teal paper & cut 4- 4x4" squares and then cropped the photos to 3 3/4" squares and attached them together. Using a patterned paper I never liked; I flipped it over to the back side and cut a large strip of white. I'd have to guess 8 1/2 by 11. Using Stampin Up!'s Simply Scored tool and the new boarders plate I made "waves" down the side of the paper. I then used a teal marker to make them stand out. I attached the 4 photos to the white paper and attached the white paper to the patterned teal. I then cut a long strip of ribbon and wrapped it around the top of the paper. I found the "fun in the sun" sentiment in a pre-pack of Disney scrapbooking stuff and attached that over the ribbon, centered on the page. I found a matching square of yellow paper to write up the journaling on and held it in several different sections of the page to try and determine where it looked the most balanced. I finally choose mid-way up the left hand side of the page. I then made a small bow using the ribbon and attached it over the journaling.

For this page I used a yellow background paper and a sheet of royal blue paper. I cut a 6 1/2x 12" strip of paper out of the blue and attached three of the photos to the strip. Using Stampin Up!'s gold glimmer paper I cut two small strips 1/2x 12" (I choose to not use a large section for 2 reasons-- I find that papers don't stick well to the glitter sheet and 2 it's expensive; why use a whole section when only two small strips would show anyway!). I attached the gold strips and blue backed photos to the page. I then used my Coluzzle circle cutter to cut out my last photo, a slightly larger circle to cut the blue paper and the largest circle to cut out the glimmer paper. I then trimmed the glimmer paper so it looked more like a frame than a circle. I placed it behind the blue paper and photo but now have a small glimmer circle I can use on another project. I found a Mickey parade accent in my pile of embellishments and loved how the red stood out against the blue. I then found the "love a parade" sentiment to match. Quick, easy and coordinated. That's my style!
Tuesday, February 19, 2013
For the birds
Well, so far my plan is working. Knowing I had this blog started I decided, rather than follow the boys around and nag them all morning about getting ready for their day, that I'd take a short 10-15 break and make just one card. That was my goal and I'm happy to say I LOVE the cute, quick and easy card I came up with.
I tend to pick boyish colors and kid themes, not only because of my 3 boys, but because I have 16 nieces and nephews with one more on the way (all aged 9 & under!), not to mention all the assorted friends of the boys and kids of our friends. We're surrounded by kids and kids birthday's so I like to be prepared in case one sneaks up on us. The majority of the kids are boys and I find boys/ men are harder to make cards for in general, but I'm getting better at it.
For this card, I used navy card stock to make the card and then used a lighter blue for the background. I used my big shot and a letterpress die, inked with night of navy craft ink, to "stamp" the fans on the background paper. I then stamped my bird image using basic black on a small strip of white card stock and used the markers to color them in yellow. I used my adhesive to assemble the card and tied a pretty yellow ribbon bow on the side. It was simple-- any beginner stamper could easily make this card and it was very quick. I hope you like it!

Monday, February 18, 2013
Stampin Up! Club
I have a girl's night out once a month where myself, a bunch of other wonderful ladies and my local Stampin Up! Demonstrator get together and stamp. It's great fun and last night was no exception. One of the ladies just had a cute little baby girl and her baby nephew was there too so I not only got to make two beautiful cards, I got to hold two adorable little babies too. What could be better?!
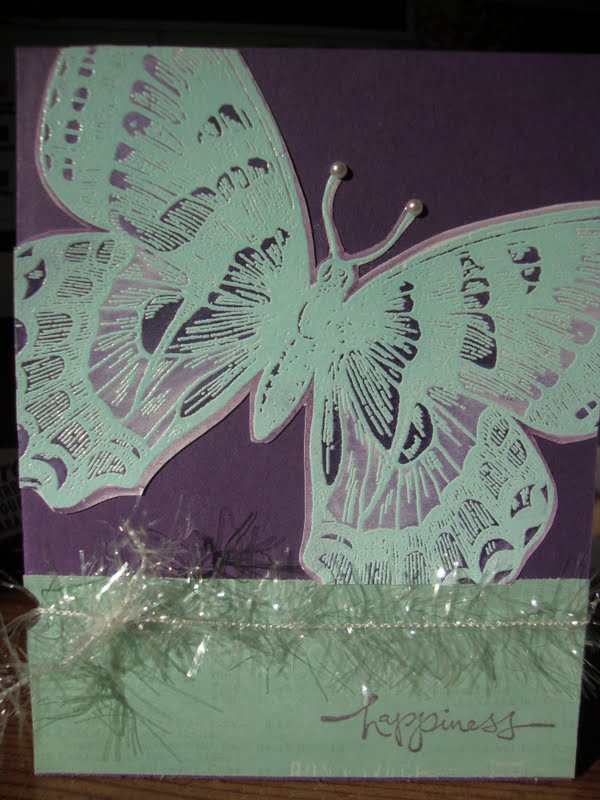
The first card, I have to admit, was not the one we made at camp last night. We used Stampin Up!'s new Swallowtail butterfly stamp and the pool party embossing powder to emboss the butterfly on white card stock. We were then supposed to color the butterfly in with orange, yellow and purple ink using our blender pens. I'm not a huge fan of orange and planned to use only purple and yellow, but I ended up using just purple. I loved the two tones that showed up as I blended so I went with it. We were then supposed to attach the whole butterfly (with white background included) onto a yellow card front; which I did.... but I just didn't love it. Fast forward to this morning where I decided to cut out the butterfly and adhere it to the front of a purple card. I trimmed the edges of the butterfly even more to fit at the top of my card. Used some Pearl stickers on the antenna, and attached a strip of green paper at the bottom of the card. Using the word window punch I made a small circular cut in the edge of the card and threaded the ribbon through it. I thought it was still missing something so I scrounged around in my drawer to find an appropriate word stamp and used my Plum stamp pad to stamp the word. Then I stood back and realized I LOVED the card. Now I can't take full credit for this as I found this card on Pinterest and used it as a jumping off point. I loved her card and so I copied the layout; honestly this is one card I probably would have copied exactly if I had the supplies! I often find cards I like and either use the layout or the color scheme on other cards, or use the layout and change the color scheme, etc.


I just love Pinterest and you can follow my stamping/scrapping board here
The first card, I have to admit, was not the one we made at camp last night. We used Stampin Up!'s new Swallowtail butterfly stamp and the pool party embossing powder to emboss the butterfly on white card stock. We were then supposed to color the butterfly in with orange, yellow and purple ink using our blender pens. I'm not a huge fan of orange and planned to use only purple and yellow, but I ended up using just purple. I loved the two tones that showed up as I blended so I went with it. We were then supposed to attach the whole butterfly (with white background included) onto a yellow card front; which I did.... but I just didn't love it. Fast forward to this morning where I decided to cut out the butterfly and adhere it to the front of a purple card. I trimmed the edges of the butterfly even more to fit at the top of my card. Used some Pearl stickers on the antenna, and attached a strip of green paper at the bottom of the card. Using the word window punch I made a small circular cut in the edge of the card and threaded the ribbon through it. I thought it was still missing something so I scrounged around in my drawer to find an appropriate word stamp and used my Plum stamp pad to stamp the word. Then I stood back and realized I LOVED the card. Now I can't take full credit for this as I found this card on Pinterest and used it as a jumping off point. I loved her card and so I copied the layout; honestly this is one card I probably would have copied exactly if I had the supplies! I often find cards I like and either use the layout or the color scheme on other cards, or use the layout and change the color scheme, etc.
Our second card was a 2 step stamping card. I love 2 step stamping! We started with a navy card and stamped the large french script background stamp in crumb cake on vanilla paper then wrapped it in crumb cake ribbon and adhered it to the card front. Using another piece of vanilla paper we stamped two large flowers and two small flowers in light blue and 3 sets of leaves in light green. We then stamped right over the images using dark blue ink and dark green. We then cut out the flowers and leaves and adhered them to the card front.

I just love Pinterest and you can follow my stamping/scrapping board here
Subscribe to:
Posts (Atom)