Pages

Monday, September 28, 2015

Dragon Party

    We've watched the How To Train Your Dragon movies, listened to most of the books, and picked out a Toothless Dragon Halloween costume for this October, so I wasn't surprised when I found myself planning a Dragon party.  The movies are not as popular as they once were and this made it a bit difficult to find all the party supplies but with a bit of luck and determination we pulled off a great party!


     Games/ Activities:

  • Each child picked/ made up a viking name for themselves; we had a few destroyers and crushers running around.
  • They each got to decorate their own shield.  I found black foam core at the $1 store and we just them into circles.  I then used duct tape to make the handles on the back.  We used stickers, metallic markers, crayons and colored pencils to decorate them.  
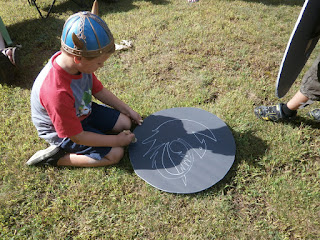
    Decorating shields 
  • We used watercolor crayons to paint the kids faces for battle.  Most of them chose to draw lines or weapons on their foreheads.  
  • I put sidewalk chalk out in the driveway for anyone to draw a picture of their pet dragon
  • We hung paper dragon posters throughout the yard and gave each child a can of silly string to go hunt the dragons.  Of course they also had a great time spraying each other a few of the adults too.  
    They found all the dragons and COVERED them in silly string! 
  • I made some yarn pompoms and glued a sheep face onto each one.  We then bought three $1 bins at the dollar store and set up a sheep toss station.  The kids all took turns trying to get the sheep in the buckets.
  • Our fluffy sheep. 
    Our basket toss set up.  
  • I decorated our hula hoop with yellow and orange streamers to make it look like a ring of fire and offered to hold it up for the kids to see if they could get the flying Toothless toy through the ring.  They ended up deciding to just play with the Toothless toy; winding him up, letting him fly and trying to chase him/catch him.  It was a pretty cheap plastic toy where the kids had to wind up the elastic like a toy plane and it broke in no time (wish I had read all the reviews on-line before buying!).  It was a bit disappointing but the kids did have fun while it lasted. 
  • Mostly, though, the kids all had a ball running around the yard with their viking helmets, homemade shields and a toy weapon from one of the boy's toy bins.  
    We bought these toys viking helmets for the kids in place of goodie bags.
Supplies and Decorations we bought:
   On top of the few supplies we found at the dollar store, grocery store, and those already listed with Amazon links.  We also bought a few other goodies from Amazon for the party.
  • A How to Train Your Dragon Party pack 
  • Stickers for the shields that were also How to Train Your Dragon themed. 
  • We bought this Room Kit to use for the dragon cutouts and shield decorations for the sheep toss game.  We also used the large posters on our doors.  


Food/Snacks:

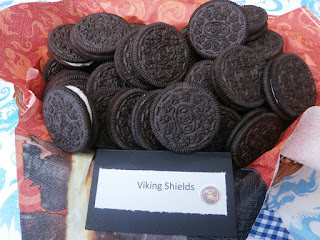
    I just love coming up with catchy names and fun names for party snacks.  I even make up little labels and try to stick to a color theme for the serving platters and plates. 

The cake was decorated to look like the ocean and we topped it
with a Hiccup and Toothless topper 


"fire balls"

The dragon poop was easy to make; we melted green chocolate melts (and
chocolate melts) added some mini marshmallows to it and then spooned some of
the mixture out onto wax paper to dry; sprinkling them with colored sprinkles before they dried. 

Dragon claws 

Dragon scales 

dragon blood and dragon spikes 

dragon drool 

Our completed table- scape.  


Linking Up With:
This Is How We Roll Thursday Party

I Choose Joy!

A Kreative Whim

Thursday, September 10, 2015

Welcome New Baby!

Wanting to welcome a new addition into the family, I made his mother a scrapbook.

I often make blank scrapbook pages for new mothers.  I think it's the perfect gift to welcome a new baby.  Even if they are crafty it helps them out at a time when they would not have much time for crafts.


I try to make most pages with space for 2-3 4x6 photos and include generic titles.  Here's the book I put together (all for under $30; Including the scrapbook itself!) using Diecuts With a View Baby Boy paper stack.  
New Baby Nursery


I loved this darling little mobile sticker I found; the mobile pieces actually move!  


Linking Up With: Titus 2 Tuesday, Wonderful Wednesdays,

Coffee & Conversation with Pat and Candy!


This Is How We Roll Party Button

A Kreative Whim


Sunday, August 30, 2015

Cute Little Dragon!

   My son requested a How To Train Your Dragon party for his birthday this year.  He got a new blanket with Hiccup and Toothless the other day and just loves his blanket so much.  It doesn't hurt that we're listening to the How to Train Your Dragon books on CD and we've seen both the movies.  Toothless is an adorable little dragon.  Within a day or so I had tons of great party ideas after searching Pinterest for party ideas.  But I had no good invitation ideas.  Being a card-maker I was NOT going to buy any but I really wanted something that had to do with dragons or eggs or vikings.  So I kept looking and looking.  I found a few cute dinosaur and monster cards that I thought might work.  After playing around for five minutes or so I came up with the most adorable Toothless invitation.  Even if I did use some unusual tools to do it.

Isn't he just darling?!   I love when I surprise myself like that!  Here are the instructions for how I made my dragon card:

1. Cut paper to 4 1/4 x 11 and fold in half.


2.  Form the rounded nose of the dragon at the bottom of your card.  I ended up looking around for something to trace and believe it or not the perfect shape was my Kitchen Aid Mixer blade!  I traced the shape using an embossing stylus pen and then cut along the line with my scissors.

3.  Using my large oval punch from Stampin' Up! I cut two yellow eyes and affixed them to the card front fairly close together and at a slight angle.  I then punched two black circles using the 3/4" circle punch and used double sided adhesive to affix them to the center of the yellow ovals.


4.  At this point I had what looked like a snake and I was stuck for ideas.  So I searched for pictures of Toothless and found a few simple drawings and crafts that showed him with his ears and scales.  Inspired I drew what looked like a W with an extra point at the top of the card to form the dragon's ears and scales.  I then cut them out and asked the kids who I was making.  They all knew right away that it was toothless.

5.  Finally using my stylus I traced a few bumps and circles between the eyes going up toward the scales/ears for his scales on his face.  They don't show up well in the pictures or really even all that well in person but I just felt like I couldn't leave his face plain.


Thursday, March 12, 2015

Aquarium Mania

  The boys and I often seem like we're drawn to water.  I love scrapbooking pages about pools, aquariums and even just watching them playing in the water.  For me it's all about the blue and green color schemes for them it's just about the fun.  I often have a huge pile of pictures waiting to be scrapbooked and so I prefer quick and easy designs and layouts.  It's not always easy keeping my ideas fresh and new.  I often scrap the same activity for each of the boys so I'm usually forced to come up with three different pages for each place we visit. We also tend to visit many of the same places over and over again in a year and that makes it even harder.  I find moving the pictures around on the page, switching out embellishments and changing papers often is key for keeping things new.
For this slippery when wet page I used a shaped paper I bought off of Scrapbook.com.  I mounted the paper on some bright orange card stock and used the same orange paper to mount my photos to the bottom of the page.  I then used some bubble stickers and made a small cluster at the boom left hand side of the page & on the right hand side of the page above the picture.  The title is another sticker. I'm all about quick and easy layouts! 

For this aquarium page I mounted the four photos on a block of dark gray paper and mounted it down the middle of some turquoise paper.  the aquarium sign and all the animals were a premade sticker I bought off the internet. 

I actually found this paper in a pack of baby boy paper and thought that if I covered up the words, it would make a great aquarium page.  I carefully cut around the whale's tail and water spout and covered up the words by slipping in a small photo on top of them.  I then mounted the two remaining photos on the white section of the page and used my marker to make small stitch marks around the border.  I finished off the page with a few hand drawn water spouts by the corners of the photo and a quick title made on my Cricut using my Life's A Beach cartridge.  

It was our local aquarium's birthday and the younger two boys and I had a great day exploring the aquarium while eating cake and playing with the beluga whale.  For this page I used two background papers; one that was a blue on blue chevron and another plain blue.  I mounted all photos on white paper and then set them together on the page.  using some left over Sea World rub on's I added the penguin and his droplets of water to the page.  I had the celebrate your day sticker leftover from a birthday sticker pack and both the colors and the sentiment seemed to go nicely.