Pages

Friday, April 22, 2016

Baby Scrapbook Layouts

With another new baby coming into the family I just knew I had to make up another scrapbook.

After all it's tradition!

I always find just enjoyment in making baby scrapbook pages.  There's such excitement surrounding a new baby and it's so fun to celebrate them!


I also tend to feel a bit nervous as I'm making each scrapbook.  I always have that niggling little fear that the recipients of the gift wont like it.  Maybe I'm choosing the wrong color scheme or maybe they'd rather receive a gift that's more useful; like a package of diapers and some onesies.

And yet I have always had my gifts received with such wonder and joy.

Here is a small sneak peak at the album I'm working on now:


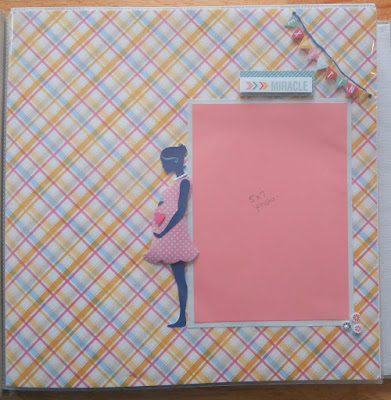
 Expectant mother page!  I never used to try and include this page since I hated having my picture taken when I was pregnant but now that my boys are older I just LOVE those pictures.  This page allows for a nice 5x7 picture of mom and her belly.  I used lots of pinks and flowers and kept it girly knowing that even if the baby is a boy the theme fits along with mom and her personality. I found a sticker set that included the silhouette, the banner, the flowers, and the title.


Look Whooo's Here! I found this cute owl paper and I knew with the greens, grays and orange that it was perfect!  I used my Cricut for the title.  Cut two 4x6 rectangles for the photos and outlined them in a chalk marker making it look like stitching.  I used my Stampin Up! Punches to make the owl on the branch and completed the page with a cutout from a paper pack all about babies.  The colors on the cutout matched perfectly and gives the mom the right spot to list the baby's name, birth date, hospital, height and weight.  I embellished the cutout with some matching ribbons.


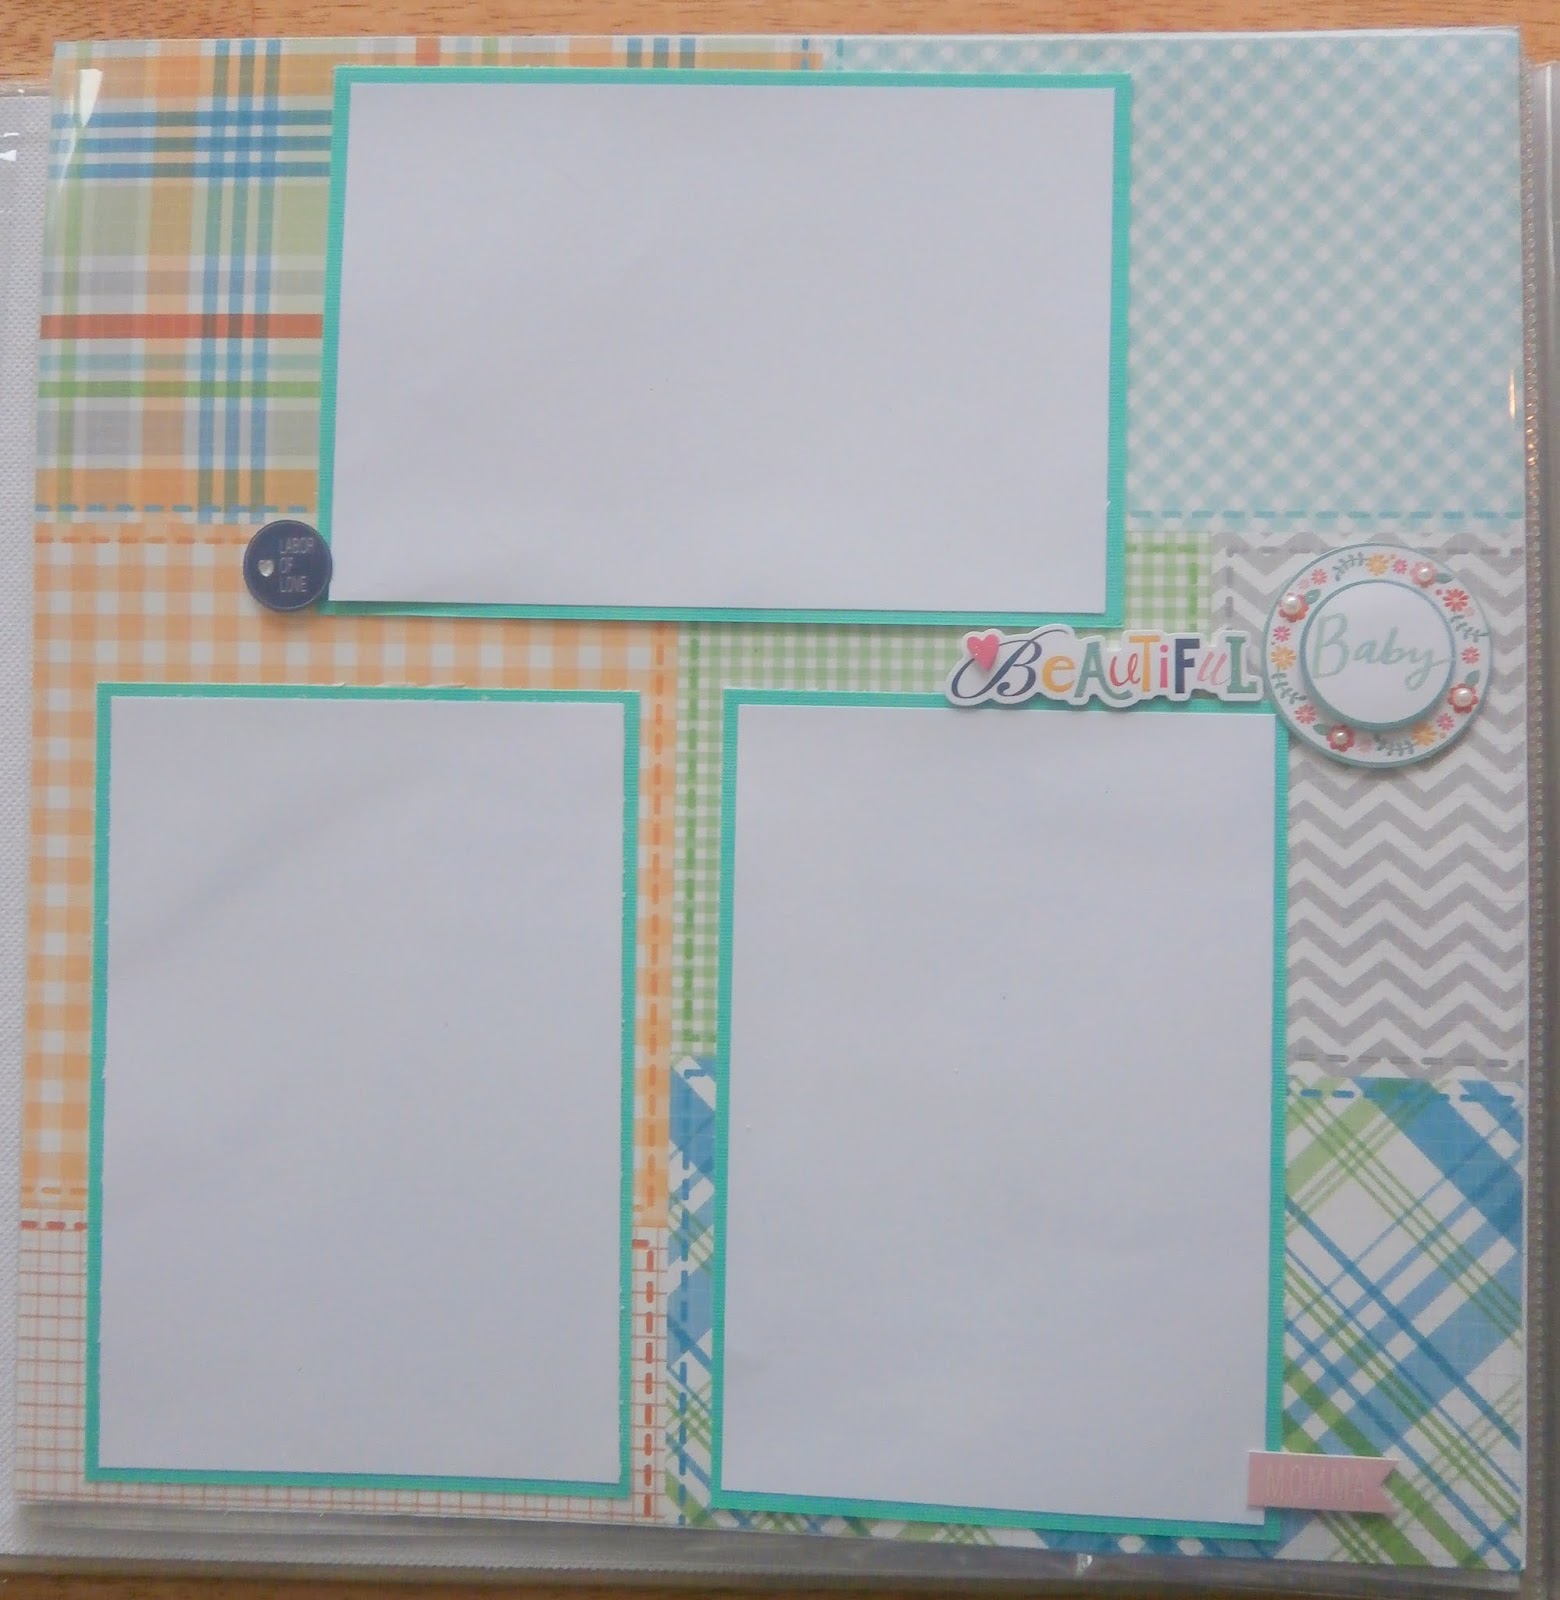
This page is perfect for a myriad of photos of the baby.  With a generic title like Beautiful Baby this page can be used for just about anything.  I stuck with greens and a variety of pastel colors so it works for boy or girl.


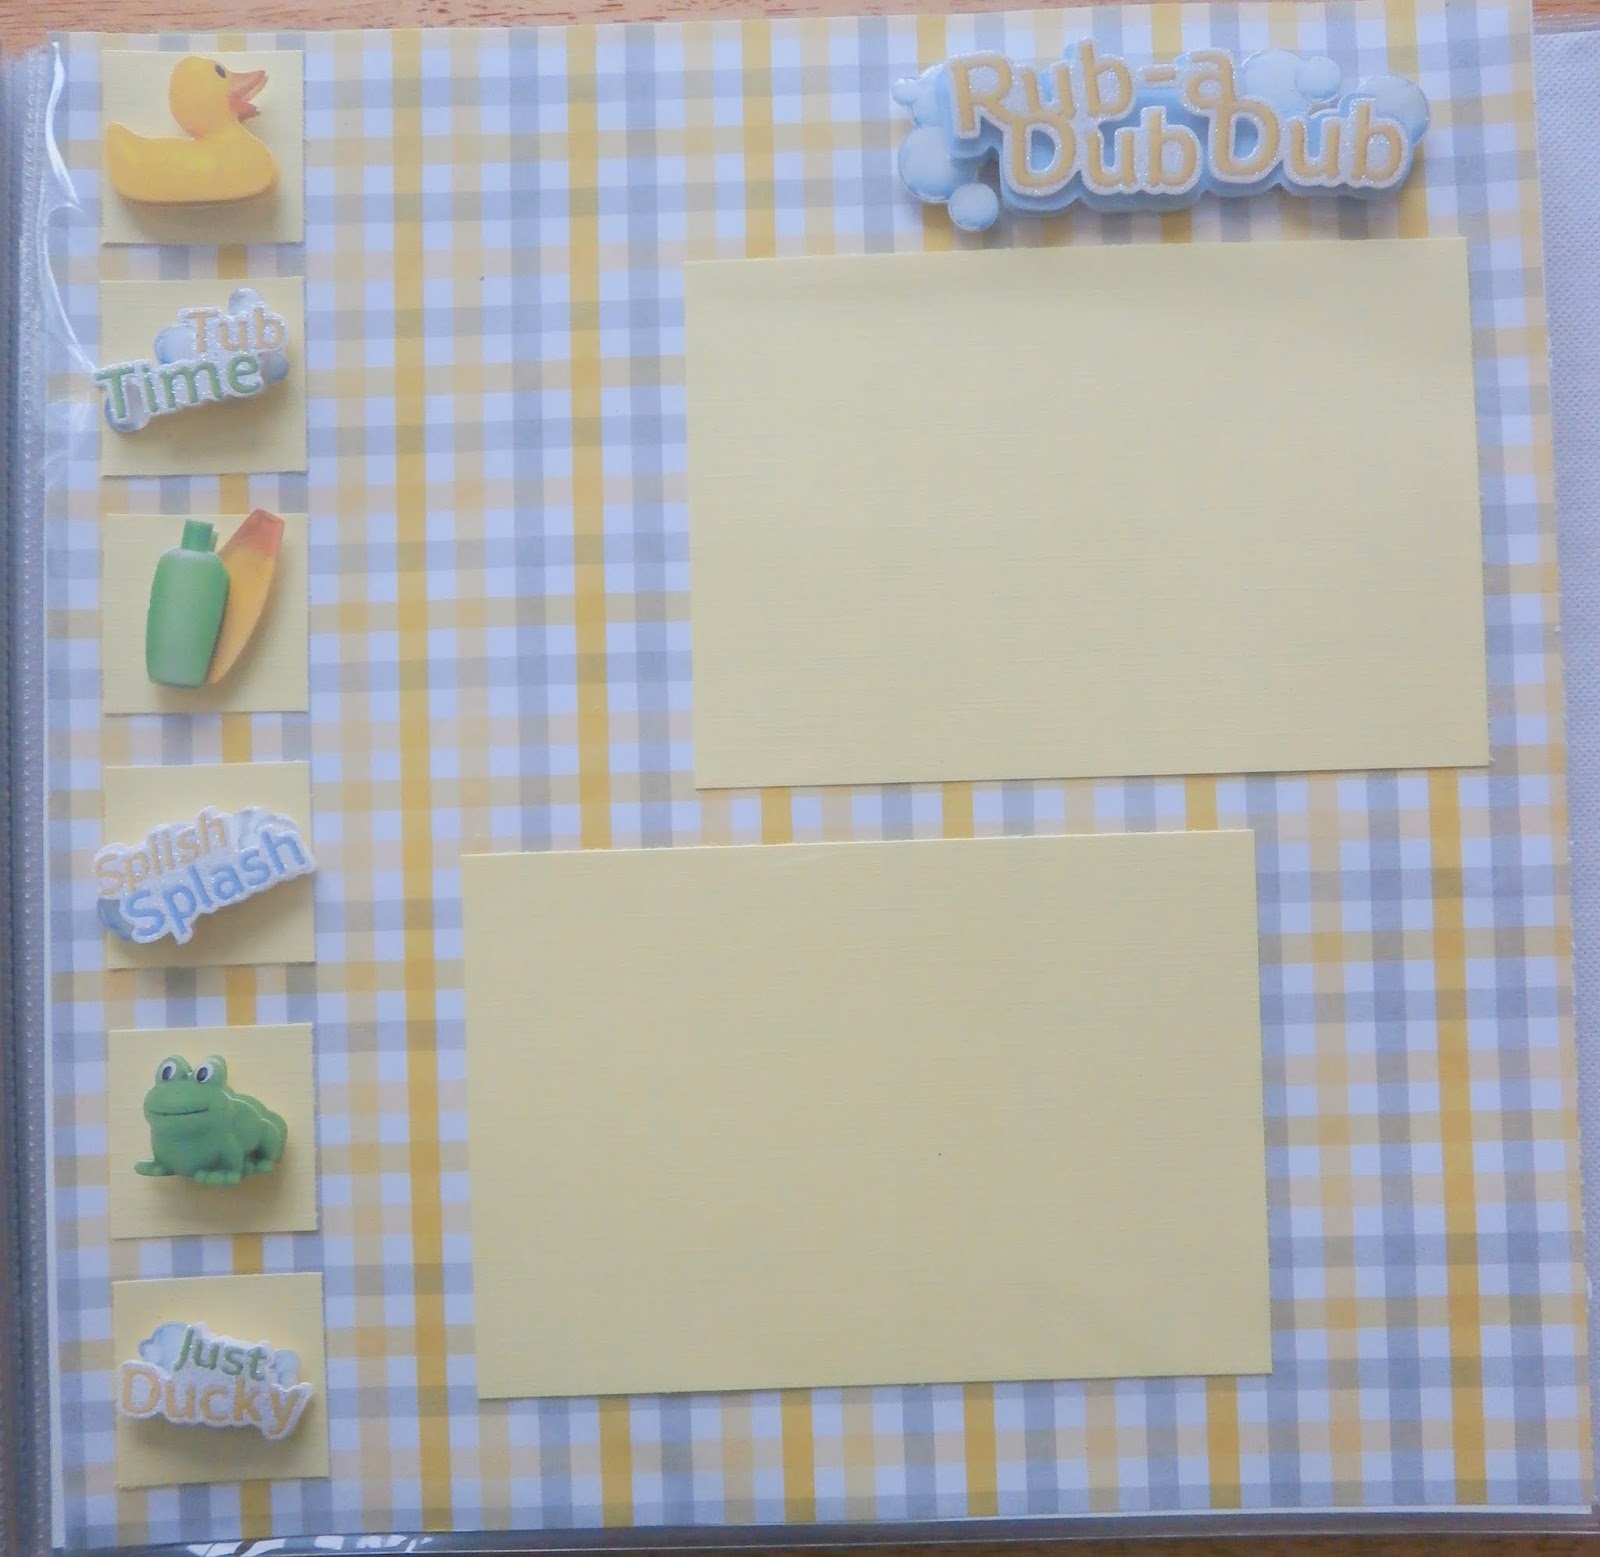
I just knew I had to use these darling stickers when I found them!  I always include a baby's first bath page and these were just too cute to pass up!  I couldn't decide which ones to use so I used them all!  I cut out tiny squares and mounted a sticker on each one.  I laid them down the side of the page and cut two larger rectangles for photos; topping the page off with the title sticker.


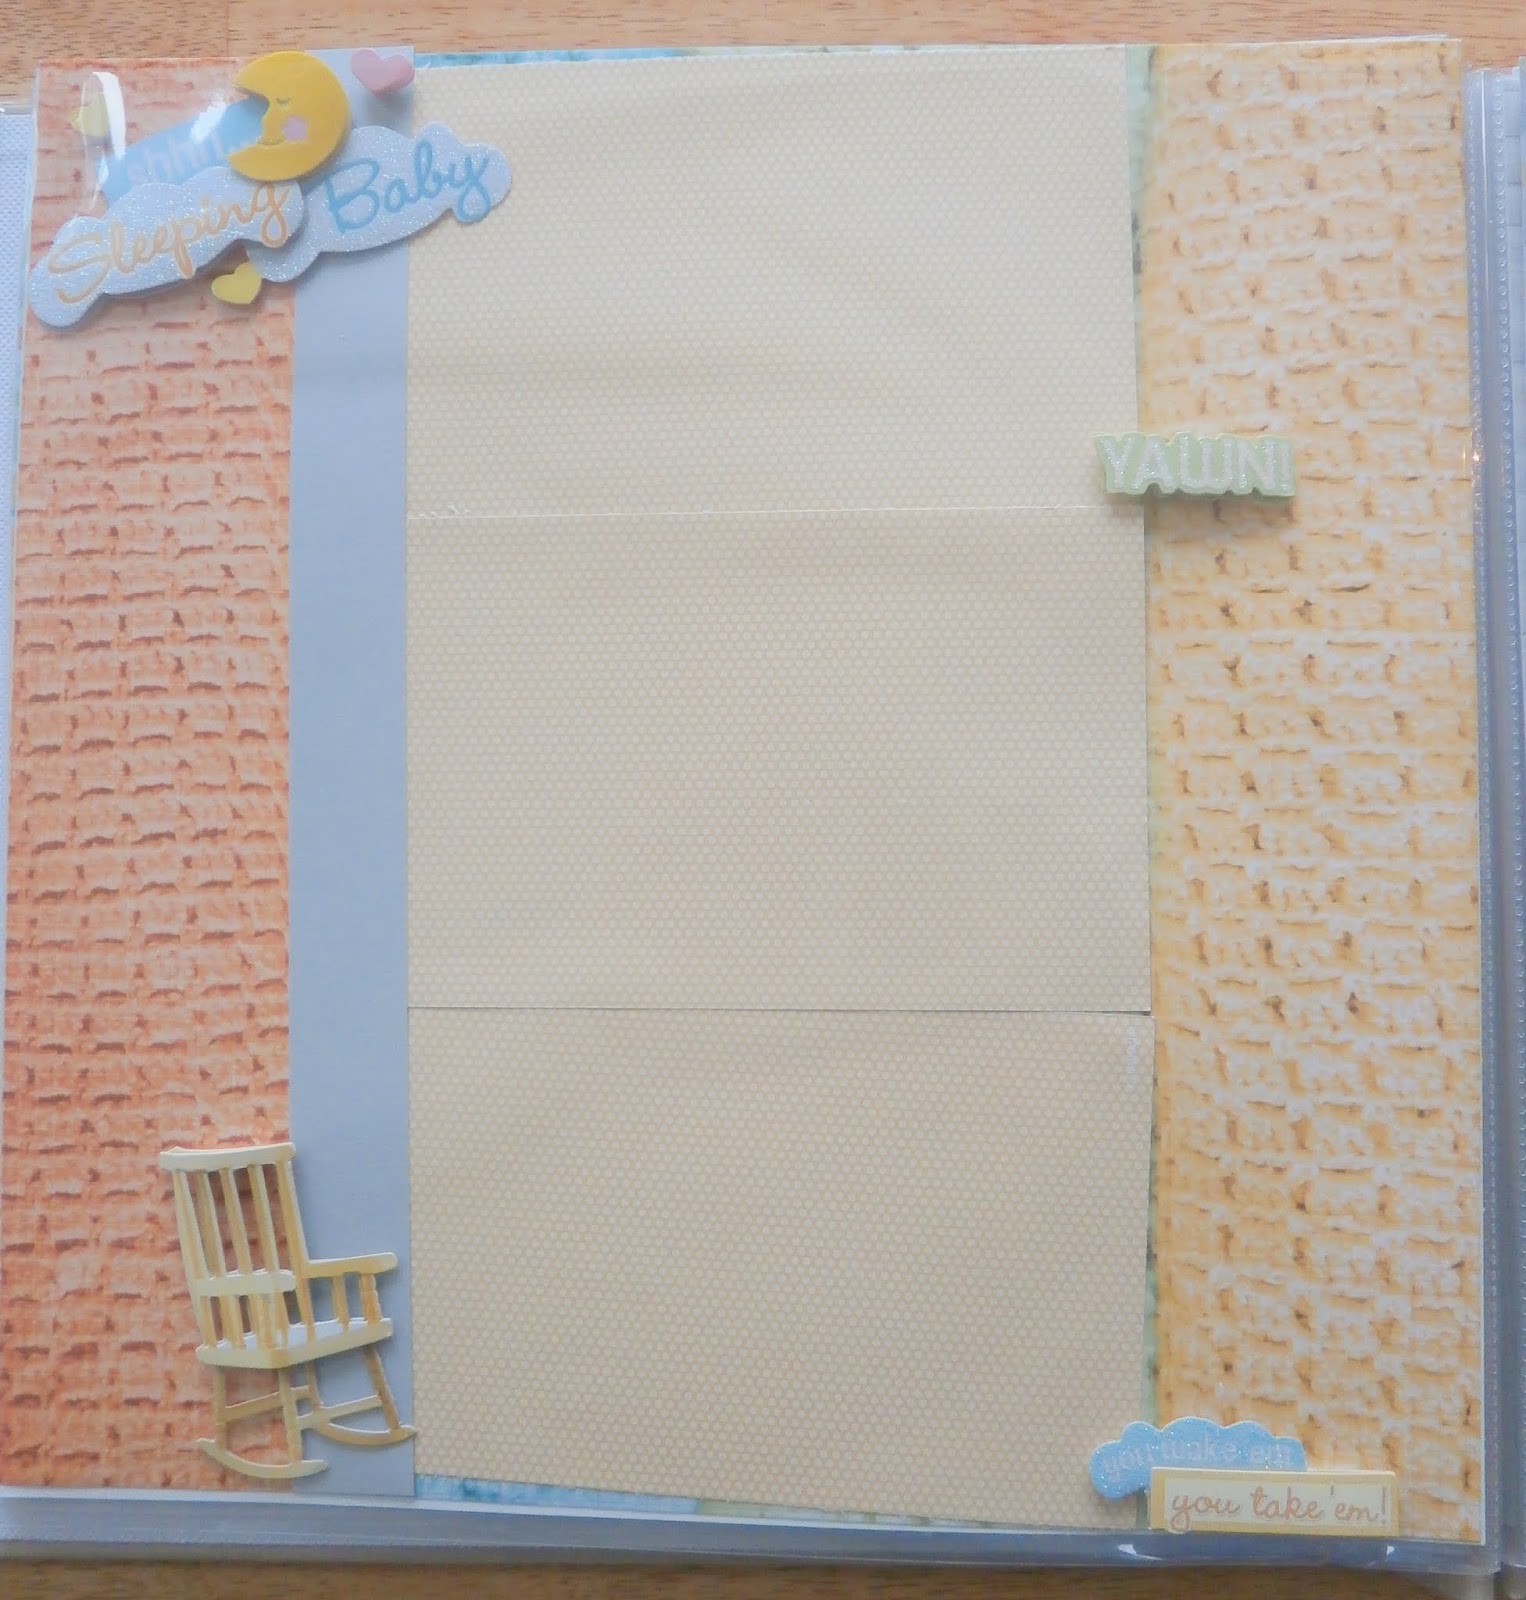
Nothing says nap time quite like a baby blanket.  I love this paper that evoked the feelings of a baby blanket and knew I wanted a sleeping baby page.  After all don't all babies look so adorable when they're sleeping?  I found the perfect title and rocking chair sticker to embellish the page and decided to put all the picture mounts right down the center of the page.

So far I'm very pleased with it all!

Linking Up With: Frugal Mommas Friday 

Photobucket


Monday, April 18, 2016

Trucks, Cake and Frogs

I spent a little time in my craft room on Friday making some birthday cards.  While my craft room is still a mess I was able to carve a little room out for myself on my table and came up with some pretty cute cards (if I do say so myself).


Using a red and white patterned paper on a red background I put a strip of black with some red ribbon down the middle.  I then stamped my images on white and mounted them on black.  I colored in the truck quickly with some markers and decided to mount that whole image on white.  I used some dimensional eyes and my loader was finished.  I then adhered the stamped images to my card.


I made this card out of brown paper and started by taping down a large rectangle of dark blue.  I then mounted a strip of blue argyle paper onto another strip of brown and adhered that to the left side of the card.  I stamped my image on white and colored it in with colored pencils.  I mounted that on brown also and adhered that to the card slightly overlapping the argyle paper.  


My last cards uses one of my favorite stamps.  I just love this little frog!  I used a white card and some green on green striped paper to make the background. I stamped my images on white.  I used some glitter on all the pink flowers and the pink heart.  I then mounted everything on blue and tied a pretty little bow around the flower strip.  Using my word punch I punched a small strip of blue, folded it in half and slipped it around my stamped frog image securing it in place with a black brad.  I then used my double sided tape to put everything onto the card front. 

Linking Up With: Titus 2 Tuesday


Our Home of Many Blessings

Friday, April 15, 2016

Fun with Field Trips

We go on so many field trips as homeschoolers and so many of our scrapbook pages are about those places we visit.  Here are a few:

Visiting Soar Indoors for the first time was so much fun.  Alec rocked the aerial course.  I just mounted each photo on green paper, laid them on the plaid background paper and cut out the title using the Cricut. 


Our zoo visit to the zoo in the fall was lots of fun.  I used Halloween themed paper and just trimmed an inch off each side of the paper then mounted it on some green.  I put each picture on orange paper and laid them out just a bit crookedly on the background paper.  I then used some sticker embellishments about animals to complete the page.


We had free tickets to Six Flags through their Read to Succeed program and we enjoyed a fun day at the park. With all the bright colors found in the pictures I knew I wanted a bright colorful background.  I found this printed paper and through it was just perfect.  I then mounted three of the photos on red and my focal picture (meeting Shaggy and Scooby!) on blue.  I rounded the outer corners on all the red mounted photos to give them some conformity and make the blue really stand out.  I finished up the page with a sticker embellishment.


Since Ian's favorite ride was the roller coaster this year and I only had three small photos I decided to try and mimic the feel of a roller coaster.  I found a simple pattern paper and used my pencil to trace a curvy line.  I cut it with the scissors and then trimmed the photos to fit inside the curves.  I cut out the title using my Cricut and found a large roller coaster sticker to finish it off.


Linking Up With: Together on Tuesdays,
”Frugal

Photobucket


Monday, April 11, 2016

Determined to Try!

I know it has been MONTHS since I've posted anything.

I set aside this blog to focus more on my homeschooling blog.  I willingly stopped posting and writing because I also stopped crafting and that was my mistake.

I have been feeling lost and listless and realized I was missing my creative outlet!  

I spent the last few weeks getting back into my craft room and have been scrapbbooking up a storm.

It feels so good!


I also spent the weekend cleaning out, organizing, and re- designing my room.

I can't wait to show you all!

Here is just a little teaser....

I moved the ribbon jars away from my windows; I had a whole empty shelf and they were getting discolored from the sun (and not using them!).


I moved some of the small stacking bins up onto the shelves and used my calligraphy markers to label each bin so I know just what's inside! 


My biggest organizational feat was taking apart all of my stamp sets and ordering them category then color coding them.  I only party way through this process but think it will help tremendously when I'm looking for stamps.  So far I have pink cases that are for hearts, weddings, and love.  Bright orange cases for tools and transportation.  Lilac cases for Easter.  Sage Green cases for plants and flowers.... you get the idea. 

The colored cases with hand written labels 

A peek at one of the pink cases 
Linking Up With: Together on Tuesdays, Wonderful Wednesdays, 

Monday, September 28, 2015

Dragon Party

    We've watched the How To Train Your Dragon movies, listened to most of the books, and picked out a Toothless Dragon Halloween costume for this October, so I wasn't surprised when I found myself planning a Dragon party.  The movies are not as popular as they once were and this made it a bit difficult to find all the party supplies but with a bit of luck and determination we pulled off a great party!


     Games/ Activities:

  • Each child picked/ made up a viking name for themselves; we had a few destroyers and crushers running around.
  • They each got to decorate their own shield.  I found black foam core at the $1 store and we just them into circles.  I then used duct tape to make the handles on the back.  We used stickers, metallic markers, crayons and colored pencils to decorate them.  
    Decorating shields 
  • We used watercolor crayons to paint the kids faces for battle.  Most of them chose to draw lines or weapons on their foreheads.  
  • I put sidewalk chalk out in the driveway for anyone to draw a picture of their pet dragon
  • We hung paper dragon posters throughout the yard and gave each child a can of silly string to go hunt the dragons.  Of course they also had a great time spraying each other a few of the adults too.  
    They found all the dragons and COVERED them in silly string! 
  • I made some yarn pompoms and glued a sheep face onto each one.  We then bought three $1 bins at the dollar store and set up a sheep toss station.  The kids all took turns trying to get the sheep in the buckets.
  • Our fluffy sheep. 
    Our basket toss set up.  
  • I decorated our hula hoop with yellow and orange streamers to make it look like a ring of fire and offered to hold it up for the kids to see if they could get the flying Toothless toy through the ring.  They ended up deciding to just play with the Toothless toy; winding him up, letting him fly and trying to chase him/catch him.  It was a pretty cheap plastic toy where the kids had to wind up the elastic like a toy plane and it broke in no time (wish I had read all the reviews on-line before buying!).  It was a bit disappointing but the kids did have fun while it lasted. 
  • Mostly, though, the kids all had a ball running around the yard with their viking helmets, homemade shields and a toy weapon from one of the boy's toy bins.  
    We bought these toys viking helmets for the kids in place of goodie bags.
Supplies and Decorations we bought:
   On top of the few supplies we found at the dollar store, grocery store, and those already listed with Amazon links.  We also bought a few other goodies from Amazon for the party.
  • A How to Train Your Dragon Party pack 
  • Stickers for the shields that were also How to Train Your Dragon themed. 
  • We bought this Room Kit to use for the dragon cutouts and shield decorations for the sheep toss game.  We also used the large posters on our doors.  


Food/Snacks:

    I just love coming up with catchy names and fun names for party snacks.  I even make up little labels and try to stick to a color theme for the serving platters and plates. 

The cake was decorated to look like the ocean and we topped it
with a Hiccup and Toothless topper 


"fire balls"

The dragon poop was easy to make; we melted green chocolate melts (and
chocolate melts) added some mini marshmallows to it and then spooned some of
the mixture out onto wax paper to dry; sprinkling them with colored sprinkles before they dried. 

Dragon claws 

Dragon scales 

dragon blood and dragon spikes 

dragon drool 

Our completed table- scape.  


Linking Up With:
This Is How We Roll Thursday Party

I Choose Joy!

A Kreative Whim

Thursday, September 10, 2015

Welcome New Baby!

Wanting to welcome a new addition into the family, I made his mother a scrapbook.

I often make blank scrapbook pages for new mothers.  I think it's the perfect gift to welcome a new baby.  Even if they are crafty it helps them out at a time when they would not have much time for crafts.


I try to make most pages with space for 2-3 4x6 photos and include generic titles.  Here's the book I put together (all for under $30; Including the scrapbook itself!) using Diecuts With a View Baby Boy paper stack.  
New Baby Nursery


I loved this darling little mobile sticker I found; the mobile pieces actually move!  


Linking Up With: Titus 2 Tuesday, Wonderful Wednesdays,

Coffee & Conversation with Pat and Candy!


This Is How We Roll Party Button

A Kreative Whim