Pages

Sunday, August 30, 2015

Cute Little Dragon!

   My son requested a How To Train Your Dragon party for his birthday this year.  He got a new blanket with Hiccup and Toothless the other day and just loves his blanket so much.  It doesn't hurt that we're listening to the How to Train Your Dragon books on CD and we've seen both the movies.  Toothless is an adorable little dragon.  Within a day or so I had tons of great party ideas after searching Pinterest for party ideas.  But I had no good invitation ideas.  Being a card-maker I was NOT going to buy any but I really wanted something that had to do with dragons or eggs or vikings.  So I kept looking and looking.  I found a few cute dinosaur and monster cards that I thought might work.  After playing around for five minutes or so I came up with the most adorable Toothless invitation.  Even if I did use some unusual tools to do it.

Isn't he just darling?!   I love when I surprise myself like that!  Here are the instructions for how I made my dragon card:

1. Cut paper to 4 1/4 x 11 and fold in half.


2.  Form the rounded nose of the dragon at the bottom of your card.  I ended up looking around for something to trace and believe it or not the perfect shape was my Kitchen Aid Mixer blade!  I traced the shape using an embossing stylus pen and then cut along the line with my scissors.

3.  Using my large oval punch from Stampin' Up! I cut two yellow eyes and affixed them to the card front fairly close together and at a slight angle.  I then punched two black circles using the 3/4" circle punch and used double sided adhesive to affix them to the center of the yellow ovals.


4.  At this point I had what looked like a snake and I was stuck for ideas.  So I searched for pictures of Toothless and found a few simple drawings and crafts that showed him with his ears and scales.  Inspired I drew what looked like a W with an extra point at the top of the card to form the dragon's ears and scales.  I then cut them out and asked the kids who I was making.  They all knew right away that it was toothless.

5.  Finally using my stylus I traced a few bumps and circles between the eyes going up toward the scales/ears for his scales on his face.  They don't show up well in the pictures or really even all that well in person but I just felt like I couldn't leave his face plain.


Thursday, March 12, 2015

Aquarium Mania

  The boys and I often seem like we're drawn to water.  I love scrapbooking pages about pools, aquariums and even just watching them playing in the water.  For me it's all about the blue and green color schemes for them it's just about the fun.  I often have a huge pile of pictures waiting to be scrapbooked and so I prefer quick and easy designs and layouts.  It's not always easy keeping my ideas fresh and new.  I often scrap the same activity for each of the boys so I'm usually forced to come up with three different pages for each place we visit. We also tend to visit many of the same places over and over again in a year and that makes it even harder.  I find moving the pictures around on the page, switching out embellishments and changing papers often is key for keeping things new.
For this slippery when wet page I used a shaped paper I bought off of Scrapbook.com.  I mounted the paper on some bright orange card stock and used the same orange paper to mount my photos to the bottom of the page.  I then used some bubble stickers and made a small cluster at the boom left hand side of the page & on the right hand side of the page above the picture.  The title is another sticker. I'm all about quick and easy layouts! 

For this aquarium page I mounted the four photos on a block of dark gray paper and mounted it down the middle of some turquoise paper.  the aquarium sign and all the animals were a premade sticker I bought off the internet. 

I actually found this paper in a pack of baby boy paper and thought that if I covered up the words, it would make a great aquarium page.  I carefully cut around the whale's tail and water spout and covered up the words by slipping in a small photo on top of them.  I then mounted the two remaining photos on the white section of the page and used my marker to make small stitch marks around the border.  I finished off the page with a few hand drawn water spouts by the corners of the photo and a quick title made on my Cricut using my Life's A Beach cartridge.  

It was our local aquarium's birthday and the younger two boys and I had a great day exploring the aquarium while eating cake and playing with the beluga whale.  For this page I used two background papers; one that was a blue on blue chevron and another plain blue.  I mounted all photos on white paper and then set them together on the page.  using some left over Sea World rub on's I added the penguin and his droplets of water to the page.  I had the celebrate your day sticker leftover from a birthday sticker pack and both the colors and the sentiment seemed to go nicely.  

Wednesday, March 11, 2015

Pools, Turtles, and Food

  OK, so day #2 of my new found determination to blog my crafts more often didn't go so well but it wasn't my fault!  I couldn't get pictures to post to my blog and without pictures the blog would be pretty darn boring.  I finally figured how to troubleshoot the problem and thought I'd pick up with some more vacation layouts.
We stayed at the Nick hotel and I took so many pictures by our hotel pool.  There were water slides galore, a slime bucket, and all sorts of fun fountains.  For this layout I decided to focus just on the people in the photos.  When I cropped them all nice and close and mounted them on white card stock the fit beautifully side by side.  I mounted all 6 photos on some dark blue card stock and mounted that on some rainbow printed background paper.  I used the title sticker "at the Pool" and some rafts and balls to embellish the page.  

Staying at the Nick hotel we were able to have dinner with the Ninja turtles! This was a huge highlight for my boys and I ended up with so many photos.  I always find a layout with lots of photos hard to do.  I don't want the page to just be all about the pictures but balancing photos and embellishments isn't always easy.  I happened to have one of the boy's masks in my room with me and it fell over the page; that was all it took!  I mounted all four photos on orange stock and set it off to one side of the page.  Isn't this green paper perfect?  It just happened to be the right shade of green with some orange "stitches" around the edges.  I then flipped my blue paper over and copied the mask; making sure to center the eye parts.  I cut out the mask, lined the eyes with white and used two small circle cutters to cut the black and blue parts of the eyes.  I then journaled around the mask and found the title sticker "cool dude" complete with turtles to finish off my page.  

It's a little odd but my boys loved the Steak and Shake restaurants we found in Florida.  They had such fun and loved the food so much they made us eat there at least three times (and we've sine gone back on every Florida trip!).  I just had to scrapbook it.  With only one photo this page could have been very plain and boring but I had saved their hats (like I save everything when we're on vacation) and after finding this fun black and white retro paper knew that the hat would be perfect for both a title and an embellishment.  I mounted the photo on  a large strip of black and played around with the had until I had an effect I liked.  Sometimes it's those little moments that you want to remember the most.  Three boys snuggling together, wearing hats and enjoying french fries and milk shakes were one of those memories for me.  


Monday, March 9, 2015

Back at It

  I took a pretty long hiatus from crafting and scrapbooking; though looking back on my blog it seems more like I just forgot to take pictures and blog about it.  I'm trying to make more of an effort to blog on this blog every day, but we'll see how long that lasts.  Between homeschooling and keeping up with housework, my homeschool blog, and my boys I'm not sure I have time for ANOTHER blog everyday.  I certainly have enough material though.  I have scrapbooks for all three boys and I tend to scrap everything.  My favorite things to scrap are our family vacations though. Looking back they make me so happy and thankful for all those fun family memories.
   We visited Sea World a few years back and had such a great time.  I bought a few Sea World scrap kits and pieced together other pages using lots of blue, black and greens.  It was fun for me to design these pages since those are my three favorite colors!  I hope you enjoy and if you have any questions, feel free to ask!
I cropped and mounted my photos on black stock then placed them around Shamu on some licensed Sea World Parks paper.  The mini words are from a rub- on pack I had lying around my craft room.  It was such a quick and easy Sea World layout.

I had this wonderful black, green and blue printed paper that I just loved.  Most of the colors were also found in the photos and tied them in nicely to one another.  For this page I mounted all three pictures on black card stock and staggered them slightly down the side of the page.  I took a leftover square of black paper and turned it on it's side for a diamond.  Using silver letter/ alphabet stickers I set my title around a sticker of a manta ray.  

My youngest two just HAD to get their faces painted.  It didn't matter that it was scorching hot.  It didn't matter that it was itchy.  They wanted to have their whole face painted and I'm glad we let them.  They came out so beautifully.  For this layout I mounted all the photos on two colors of card stock; one a light blue and the other a pale sea foam green. I decided to add interest to my background by tearing a sheet of white vellum.  I stamped butterflies in white and embossed them on the front.  I then flipped the vellum over and used chalks to color in the butterflies roughly from behind.  I mounted my butterfly printed vellum paper on some white card stock with the embossing side up and set it on the left hand side of the blue paper.  I laid out the pictures and then used some puffy glitter stickers on some sea foam green paper for the title.  I finished off the page with a small strip of blue paper on the bottom explaining our day.   

For this page I used some seashell paper and a blue & tan background paper.  I cut the seashell paper slightly smaller than the blue and tan paper and mounted the seashell paper in the center.  I mounted each photo on some blue paper and staggered them on my page.  I then used the Cricut to cut out the title and staggered that as well.  

You can't go to Sea World and now watch the whale show! It was fantastic.  I used some blue water patterned paper for my background and mounted the photos on two layers of blue card stock. All around the edges of the dark blue card stock I used my marker to make small stitch lines.  I finished off the page with some orca whale stickers, the Shamu's stadium stickers, and a few "splash" stickers I found too. 

The sea lion and otter show was funny and quite comical.  I found this great one fish, two fish, red fish, blue fish paper and thought the colors, the fish and the silliness fit right in with the theme of the show.  I mounted my photos on red card stock cut to fit most of the background paper.  I made sure to cut the center ring nice and large so I could then highlight the otter photo by mounting it on blue too.  I embellished the page using some sea lion and otter stickers as well as the title sticker and used a blue strip of card stock across the top to anchor the title and tie in with the blue circle in the center.  

Saturday, February 14, 2015

Family Valentine's Day

  Valentine's day is probably my favorite holiday.  I know most people love Christmas, but for me the holiday is just to much.  Valentine's day is much more my speed where a little love, attention and devotion are all that is required.  I look for something new to make the day special each year without breaking the bank and make sure that all my guys feel special and loved.  This year, I accomplished it all with just a few choice recipes.  We started celebrating Valentine's day as a family a few years ago and we've never looked back.  Gone are the days of trying to find a sitter or make reservations; and I don't miss them at all.  My husband and I have plenty of time alone and the boys seem to be growing up faster and faster.  It's nice to spend meaningful time with them and on Valentine's all my guys are showered with love.
  We typically buy a small box of chocolates for the boys but this year they got some new sleds (since most of their sleds broke already).  Unfortunately, they opened their sleds last week and so I knew they'd have nothing but a card to open today.  I realized around 6 o'clock last night that I hadn't even made their cards yet either.  So I quickly set to work and made cards for all three boys plus my husband.  It's not easy to make 4 cards in an hour but I did.  They aren't the the most "wow!" worthy cards I've ever made but I was pleased with how they turned out and, even better, so were the boys.


This one was for my husband 


   I spent the morning making some Dove heart peanut butter cookies for dessert.  I made the boys Valentine's day heart pizzas.  I even cut the pepperoni pieces into hearts for them.  It only took an extra two or three minutes but the boys thought that it was amazing!  We topped off their dinner with some cupid floats.  I put vanilla ice cream in their glasses, topped it off with some Code Red Mountain Dew and gave them each a Twizzler straw.  They were happy and felt pretty special. We ended our night with a family movie; Alexander and the Terrible, Horrible, No Good, Very Bad Day.  It was great.
 

Cupid floats 

three heart pizzas for three cuties that stole my heart years ago
   

Sunday, February 1, 2015

Skylanders Party

Evan decided he wanted another party at home and it had to be all about Skylanders.

We were leaving for Florida three days after his party and I had planned to keep it simple...  Then two days before the party I stumbled upon a few cute Skylanders party blogs and started thinking and planning and reading and researching.

I learned all about Skylanders one night while all the boys were in bed and planned games around each of the elements of Skylanders.

We then took a day to hit the Dollar Stores and Big Lots nearby to find all of our supplies.  The party was a huge success and Evan just loved it. 


 We always have two parties; one with all the kids friends and a much smaller one with all of their grandparents.  That means we typically have tons of cake for a few days after since I make two cakes.

I had ordered an edible cake topper for Evan's friend party so I just made a 13x9 cake and frosted the whole thing white and trimmed it with some green frosting using my star tip.  Easy peasy!


But I am most proud of my portal of power cake that I made for the grandparent party.

 It was much simpler than I thought it would be too.

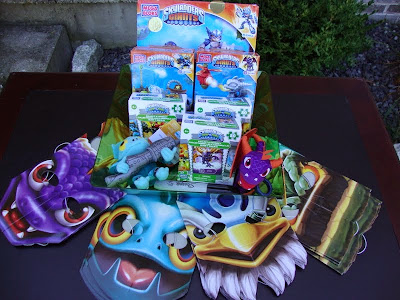
I baked two round cakes, stacked (and filled) them and frosted them in a medium blue color.  I purposely swirled the frosting on the top in concentric circles trying to keep it fairly smooth.  I then mixed up a dark gray frosting coloring using Wilton's black Icing Gel (I find all my icing gels at Michael's).  I then piped long lines around the whole cake and using the star tip made a boarder around the whole top edge of the cake.  I then piped a second row of stars following a patter of piping three stars and skipping two or three stars.  That gave me the uneven portal look.  We had some Mega Block sets and I used those Skylanders to top the cake since my son was really worried about putting real Skylanders on the cake and having them work on the Wii after (if you use real Skylanders I would recommend putting was paper or cling wrap on the bottoms of them).


 Now on to the party set up. 


I bought some cute Skylanders' masks and we put together some goodie bags.  

I found plain blue bags at the dollar store.  We put some stickers and a cup in each bag but left them mostly empty on purpose.  As they played various games they wold be putting objects in their bags to take home.  

I bought a happy birthday banner, balloons, some cheap Skylander toys, puzzles, and mega blocks sets off of Amazon.   

Food included chips, some Skylanders fruit snacks, and some blue Hawaiian punch to drink.  We kept everything as blue and green as we could to go with our color scheme.  They started out the party by picking out a Skylanders mask to wear and chasing each other around the yard.  


I planned a bunch of games; one game for each Skylanders element: air, earth, undead, fire, life, magic, tech, & water.

 I read a bit about each Skylanders character and based our game on one of the Skylanders moves.  

I know it sounds pretty time intensive but I'm not kidding when I say I pulled every one of these party games together in under 3 days.   

  • The Kids had a silly string fight using Warnado's Whirlwind power (air element).  It was a lot of fun and with I chose blue and green in keeping with our color scheme.  


  •  I found these grow capsules and filled some small dishes with water (water element).  The kids could use Slam Bam's Arctic Explosion and watch the capsules "explode."  They each put their new creatures in their goodie bags. 


  •  This game was fun and messy.  We found some sticky hands at the dollar store and with two per pack it was very reasonably priced for a party of 12.  I also found a few gem packs and mixed in some small beads.  We filled a large tray with the beads and gems and gave each kid a sticky hand.  They stood around the lid in a cluster and each used a hand to grab up as many beads and gems as they could.  We called this game Wrecking Ball's Tongue Grabber game (magic element).  They got to keep any gems or beads they gathered and add them to their goodie bag.  We kept finding beads and gems in our grass for quite a while after the party.  


  •  For Trigger Happy's Pot of Gold (tech element) we found some plastic coins (we couldn't find gold ones which is what I was really hoping for) but we ended up buying gold spray paint and just painting silver coins gold.  I know I'm nuts.  It's a bit over the top and each year I swear I'm not going to go over the top again... but I do.  Anyway, my husband and I scattered the coins all over our yard.  The kids went around and searched for all the coins.  They got to keep the coins and the one with the most coins at the end got a prize.  


  •  For Cynder Shadow's Reach Rescue (undead element) my husband and I spent a few hours blowing up balloons slightly and putting some Skylander's temporary tattoos inside the balloons.  I made sure we only used one picture of Cynder and showed all the kids what Cynder looked like.  They had to pop the balloons and whoever found Cynder won a prize.  Even if they didn't find Cynder they each got to keep a few temporary tattoos so they all won a little something.  


  •  We called this game Stopping Ignitor's Incinerate (fire element).  What better way to stop an incinerate move than throwing a bit of water on it?  Played much like an egg toss game my husband and I filled a few water balloons and broke the kids into groups of two.  The team with the last surviving water balloon won the prize.  


  •  For Terrafin's Earth Swim (Earth element) we had each of the kids plant a seed (in the Earth!).  They each got a small pot, a few seeds and planted their seeds in some potting soil.  We then watered the seeds using the water left from Slam Bam's Arctic Explosion.  They put their plant with their goodie bags.  


  •  Our last game was Stump Smash's Stump Crusher game (life element).  We blew up green balloons and tied them to a string.  We then tied one balloon around each child's ankle and told them the object was to stump crush each other's balloons.  The last child with a balloon remaining was the winner.  It was a lot of fun and even though a few kids had their balloons pop on the ground and not by another player they still enjoyed it.  

Linking Up With:

I Choose Joy!
Small Victories Sunday Linkup

Thinking Outside The Pot
Mommy A to Z Manic Mondays Blog Hop

Sunday, November 30, 2014

Christmas Cards

    This year I made a few varieties of Christmas cards, once again.  I used to find one stamp set I liked or a layout that really made me excited and mass produce all my cards but over the last couple of years I've been making several different cards as the mood strikes until I have all 40 or so cards that I need.  The above card was made using green cardstock, starry vellum paper, some silver twine, blue cardstock, and then my image was stamped on white paper.  I then colored in the globe with marker and put crystal effects on the whole thing to make it 3-dimensional and shiny. 

  This card is my favorite (sorry the picture isn't the greatest-- we had quite a few dark, gloomy days around here).  I liked it so much I made three different versions using different shades of blue paper for a total of 12 or so cards.  I used blue paper for the card and made sure I had enough extra scraps to cut out a backing for my snowflake stamped image so that they'd match.  I had some snowflake vellum paper and used clear tinsel ribbon from Stampin Up! to embellish the card.  I stamped my snowflake image on white paper using embossing ink.  I then used heat and stick powder and sprinkled the entire snowflake with Dazzling Diamonds glitter from Stampin Up!


   I loved the simplicity of this card.  I'm not usually a simple card kind of gal and tend to lean towards the more is more philosophy but once I finished this card I really loved it.  It's another card that I ended up making a dozen or so of in a variety of blue shades.  I used my snowflake punch from Stampin Up! and punched out a white snowflake.  I added a rhinestone gem to the end of each "arm" of the snowflake and stamped my sentiment "the little things" in Whisper White craft ink.